
The waves
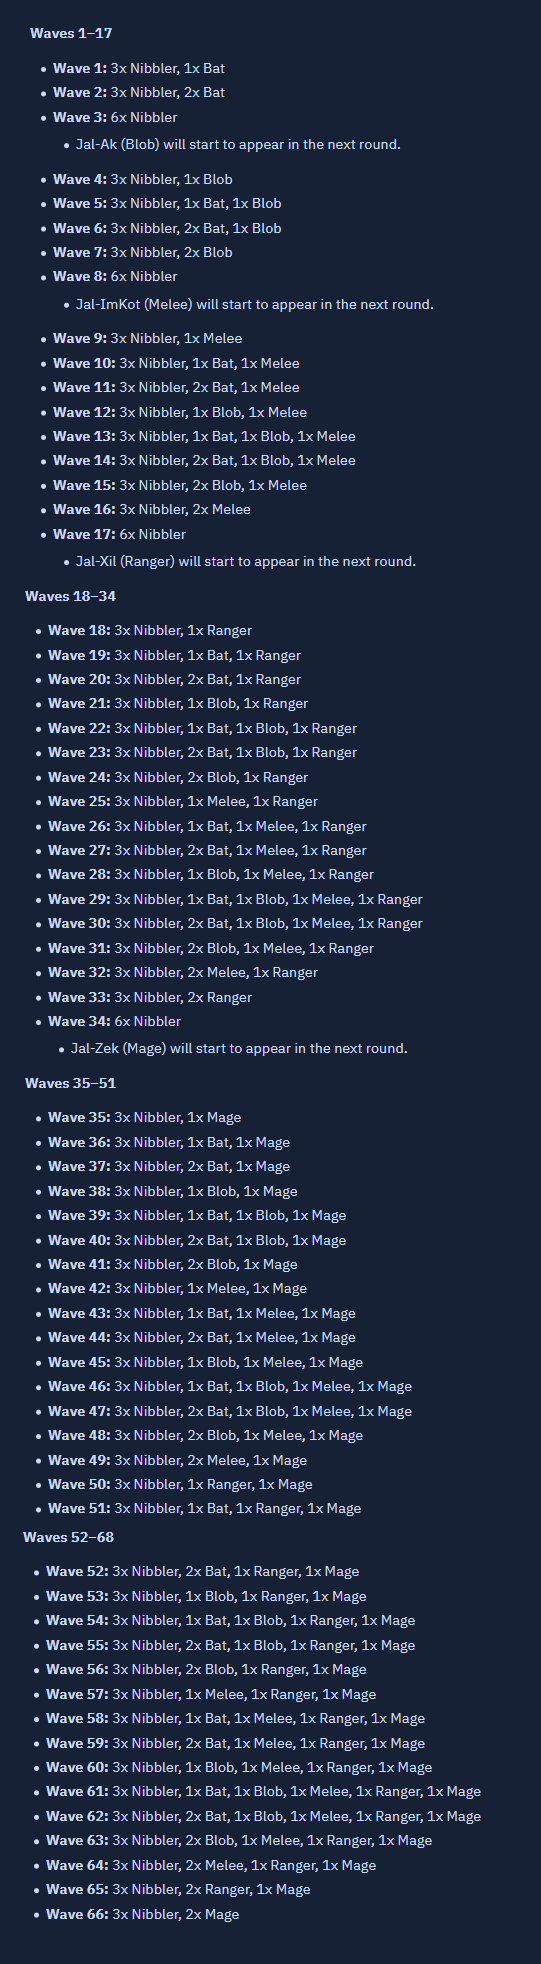
The Inferno consists of 69 total waves, with 67, 68 and 69 being the boss fights against Jad, Triple Jads and Zuk.
The first 66 waves will pit you up against several monsters from which you can only safespot at three different pillars.
List of all waves 1-66, from the OSRS wiki:
The only important pillar is the north one, as it is going to be your starting point in every wave, and there are fewer possible spawns on the north side of the inferno, making it so that all waves and their combinations can be solved using this pillar alone.
Solving spawns
Solving spawns is possibly the hardest part of the Inferno. Master this, and you are golden.
- At the start of waves 1-49, start with your mage gear equipped and get ready to throw an ice barrage on the spawn of nibblers, from wave 50 onwards you want to start in your range top and bottoms for the extra defence against north ranger spawns.
- Start on xZact tile on waves 1-49, and Kelvino tile from wave 50 onwards, you can also start on Kelvino on earlier waves if you are not comfortable.
- Begin by manually casting an ice barrage on the clump of nibblers - just one, if you do not get all of them, it is fine.
- For now, your nibblers are dealt with, you have got to look after yourself.
- To effectively solve a spawn, you will need to identify what the threat is and figure out how to deal with it within a short span of time.
Blobs (wave 4+)
- Blobs first appear on wave 4.
- There will be a lot of situations in which you will have to deal with a singular blob: here are two good methods.
Lazy flicking: Pray range or mage the tick the blob sees you, then the opposite prayer 3 ticks after. The blob will then scan 3 ticks after its attack, and the cycle continues.
One tick flicking: Pray range or mage the tick the blob sees you, and then alternate prayer every tick. This has the added benefit of not requiring much thought, but prevents you from freely doing actions while your cursor is hovering over prayer.
Lazy flicking and One tick alternating to nullify a blob, respectively
Meleer (wave 9+)
- The meleer appears on wave 9. Use the pillar to safespot it.
Ranger (wave 18+)
- Starting from wave 18, the biggest threat is the ranger. It has a high max hit and can attack from a large distance. However, you are going to be praying against it, so it is no longer a problem. The issue now is that you must work out how the other monsters will be dealt with, revolving around having your ranged prayer up for the tick the ranger attacks on.
- As mentioned previously, blobs can always be countered with one tick alternating, so they are the lowest priority threat - you can always deal with them alongside a ranger.
- Bats cannot be properly flicked due to their 3 tick attack speed. They have a very low health pool, so if it is not favourable to safespot them, you should immediately gun them down with a blowpipe when you are able to.
The meleer is going to be the true greatest threat to you. Because he does not attack with mage or range, he cannot be properly flicked with blobs, which, in turn, makes them a threat as well.
- Proper use of the pillar safespots will solve most situations.
- If not, he still attacks on a 4 tick cycle, so he can be effectively flicked against a single ranger or mager.
There will be a section of the guide dedicated specifically to the meleer and to pillar safespots, so keep in mind these two strategies when we go further into it.
Mager (wave 35+)
- Mager waves begin on 35.
All the techniques above apply to these waves, simply replace range pray with mage pray.
- Keep in mind that as the mager respawns enemies, the wave slows down with you having to kill the same enemy twice. If it is safe to do so, prioritize killing the mager above everything else first.
Waves 50+
- Waves 50 and above can be a little more complicated.
- There is now a mager and a ranger.
- You are almost guaranteed to have to deal with at least two monsters at once the further you go.
- This is something you are going to have to be able to deal with by flicking, so the strategy has now changed to revolve around getting rid of things you will not be able to flick against.
The ranger has now become the true greatest threat, and you can get killed very quickly if you are not paying attention.
- When dealing with the mager and ranger at the same time, you must offtick them or take massive damage.
- If a mager and a ranger attack one tick apart from each other, they can be flicked with blobs as well, just make sure you are praying against the mager and ranger's attacks on the correct ticks and begin the alteration pattern.
- If they attack two ticks apart, they can be flicked with two tick alternating against blobs as well. Make sure you are using the correct pattern as described earlier.
Kill what you can't flick
As usual, bats should be killed immediately.
In most cases, you will find that your greatest defence is your offence. As it turns out, when things die, they stop attacking you. You can and should kill things as soon as possible - you are going to have to do this a lot with bats, and sometimes even meleers, since they are awkward to flick in most situations, however, most of the time killing the blob early can be bad as they spawn three bloblets which hurt you more than a blob does, so try to resist the urge of killing them first.
To add to this, do not be afraid to use rigour if you need to. Being down a restore dose is miles better than being dead.
Nibblers
Once you are in a comfortable position, it is time to turn your attention back to the nibblers. You should aim to kill the nibblers that have made it to the pillar with blood barrage when all the remaining monsters are flickable:
- Get rid of bats and meleers.
- In higher waves, kill, safespot, or off-tick one of the two greater threats: either the mager or the ranger.
- As long as you flick correctly, it will be completely safe to leave the pillar and kill nibblers, while not taking so much time that they are able to chunk down the pillar in one go.
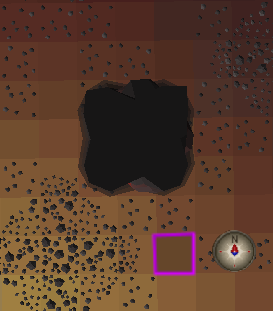
Nibbler safespot for the north pillar
From this tile, you will be able to barrage the nibblers without coming into line of sight with anything stuck directly south of the north pillar. The north pillar is the easiest to clear nibblers away from, and it is also the most important to protect.
The same concept applies to a tile near the south side of the pillar. This will naturally be used less often as being on the south side of the north pillar exposes you to more enemies, but it is just as easy to clear nibblers from.
While you should clear the nibblers on the west and south pillars as soon as you can, do not risk your life for them. Treat them merely as nibbler food to distract them from the north pillar.
Consistency
What most people find so difficult about the waves is personal inconsistency. It is difficult to feel like you are making progress when you do not get a new personal best every attempt or when you find that you are not reaching the higher waves as often.
Because the spawns are random, you will not know how to solve everything the game throws at you until you have a lot of experience.
This is perfectly normal - and this is where the practice of doing several attempts really helps you out. Your goal is not to rely on lucky spawns, but it is not to be perfect at it either. It is to play the spawns like a puzzle. Minimise the amount of times you get the solution wrong, even if you cannot get it right every time. Mistakes are, after all, the reason why everyone does not get an infernal cape right away. What you need to worry about is identifying and fixing those mistakes. If you can record your runs, watch them. If you can remember your spawn, discuss it with others. The rest will come naturally.
Making higher waves more forgiving
To make your attempts at the higher waves more forgiving:
- Pray augury at the start of a wave. This increases your chance to one shot all three nibblers, and also increases your defense should you tank something. After the ice barrage cast, pray rigour to kill any nearby dangerous enemies.
- You can pre-brew waves 60-63.
- You can tick-eat as a last resort.