
Pathing
After having dealt with your spawn, you have to get things into a favourable position - set up the wave, as it would.
Two important rules of pathing in Runescape are as follows:
- In relation to you, an NPC will always move east and west before moving north or south.
- They will move diagonally whenever they can.
Because of that, you can manipulate line of sight by standing next to the pillar, blocking out the "key tiles" that would have allowed the NPC to see and attack you.
For example, this far southwest spawn mager is not able to attack me only because I am right next to the pillar. If I were one tile further north, it would attack me.
Another practical situation is being able to pull a midwest spawn closer to you and into Tbow range, by moving to the easternmost tile north of the pillar and forcing it into a position where you can reach it.
Corner safespots
A very useful application for this mechanic is the use of corner safespots.
Corner safespots on the north pillar:
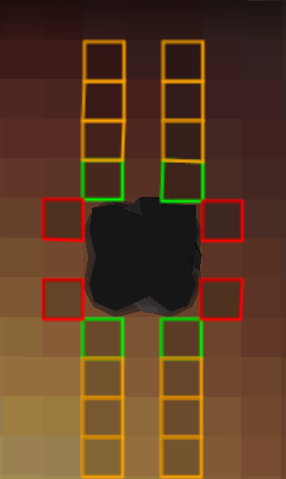
- Green tiles: your position.
- Red tiles: corner safespotted monster - from these tiles, an NPC is unable to attack you, and you are unable to attack it.
- Orange tiles: you can attack a safespotted meleer from any of these.
- You can manually de-safespot a corner by moving one tile in the north or south direction, depending on the side of the pillar.
- You can then move back to the original tile to re-safespot it.
- Moving east or west for any corner safespot will result in the NPC moving and making it so that they cannot be safespotted there again.
Utilizing the "Orange tiles", I cannot be attacked by the meleer.
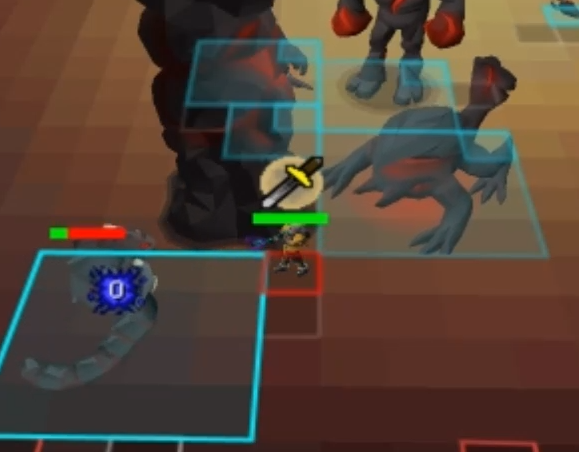
Utilizing the "Red" and "Green" tiles, the mager cannot attack me until I step off the green tile.
NPC safespots
This will cover specific NPC safespots: the bat, the meleer and the bloblets.
The bats and the meleers should be prioritised for killing, but if you can find yourself in one of these positions, you will not take any damage from them.
Monsters will get stuck when you are on the west side and south side of the pillar, in either direction.
Meleer
- For the meleer, make sure you are at the centre tile of the pillar or further away. You can also use the corner safespots above to move around the pillar while keeping the meleer safespotted.
Because the meleer is stuck here, he digs to me after a certain amount of time.
Bat
- For the bat, you will have to be five tiles away to avoid its attacks.
This is a very useful tile for dealing with bats south of the pillar.
Bloblets
- If you kill a blob in one of these positions, the bloblets will spawn clumped up together, as long as you are at least 3 tiles away. Only the range bloblet will be able to see you until you kill it, so prepare to pray ranged.
Should I brew?
Before we get into the pillar stacks…
If at any point during the Inferno you have to ask yourself, "Should I brew?", the answer is "Yes."
There is absolutely no point in forcing yourself to conserve supplies. Conserving supplies is a skill you will naturally develop with more experience.
This is part of a greater problem that I must address for the sake of your own success: a lot of people have this twisted notion that time does not matter, that you can spend as long as you want in an attempt because it is better to get a, quote unquote, perfect run. There is no perfect run. You will screw up, several times in fact. And that is completely fine, but you have to recognize that in order to progress.
Sitting behind the pillar waiting for SGS specs for hours on end is doing nothing but rusting yourself for no reason whatsoever. You will be out of your game, you will be more nervous for the next wave and you will be incredibly discouraged from continuing if you fail the attempt.
Time does matter, because in the Inferno, time investment and difficulty are one and the same.
Your cape is waiting for you, but she is impatient. Do not leave her hanging.